
How To Screenshot On Mac?
Taking screenshots on Mac computer is a great way to capture and document your work or activities. Whether you need to save an online tutorial, share something with a colleague, or remember something for later, having the ability to take a screenshot quickly can be very useful. But if you’re new to using Macs, you might need to learn how to do this.
Taking screenshots on a Mac is easier than ever in 2022. Whether you’re using a Macbook Pro, Macbook Air, or iMac, capturing an image of your screen and saving it to your hard drive takes just a few seconds. This beginner’s guide will take you through all the steps necessary to screenshot on your Mac in 2022-23.
How to screenshot on Mac? Beginners guide
What is a Screenshot?
A screenshot is an image of what is currently on your computer or device screen. For those who use Apple products such as a Mac, iPhone, or iPad, it’s easy to take a screenshot with just two keystrokes.
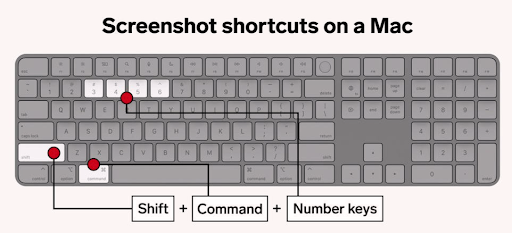
On a Mac, press Command+Shift+3 to create a screenshot on mac of your entire screen. You can also press Command+Shift+4 to select specific sections or windows you want to capture. Once taken, the screenshots on mac are saved as .png files on the desktop and can easily be shared with others via email or chat applications.
For users of Apple IOS devices – iPhones and iPads – simply pressing the top button and home button simultaneously will capture an image of the current display once released. These images are stored in Photos, making sharing easy across multiple platforms like WhatsApp, Facebook Messenger, Hangouts, and more!
Types of Mac Screenshots
Screenshots on mac are a handy tool for anyone who owns a Mac. Whether you’re trying to show someone how to use a specific feature or want to save something you found online, taking and saving screenshots on Mac is easy. By understanding the types of screenshots on mac are available, you can quickly capture and share whatever you need.
There are two main types of screenshots on mac: full screen and window-specific. A fullscreen screenshot will capture everything on your screen, including any open windows or applications running in the background. On the other hand, window-specific screenshots only capture the contents of one active window. Both screenshots on mac will save as image files (.png).
Taking a Screenshot with Keyboard Shortcuts
Mac is a great operating system for creating and sharing content quickly. For Mac users, taking a screenshot can be done in seconds with just a few keyboard shortcuts. With the help of these handy shortcuts, you can capture anything on your screen and share it with others in no time!
Taking a Single Screenshot
Knowing how to take a screenshot on a Mac is an invaluable tool for anyone who uses Apple’s iOS. It lets you quickly capture whatever is currently on your computer screen, whether text, images, or videos. The process of taking a single screenshot on Mac is relatively straightforward.
To take a single screenshot on Mac, press the ‘Command’ + ‘Shift’ + ‘3’ keys simultaneously. You will then hear a shutter sound as the image of your screen has been captured as an image file and saved onto your desktop in either JPEG or PNG format, depending on your settings. If you need to select only part of the screen, press ‘Command’ + ‘Shift’ + ‘4’. This will turn the cursor into a crosshair which can be used to select the area that needs capturing.
Taking Multiple Screenshots
Do you need to take multiple screenshots on Mac? With Apple iOS, it’s easy to do! All you need is the “Command+Shift+4” keyboard shortcut. This combination of keys captures a rectangular portion of your screen and saves it as a file on your desktop.
But what if you want to capture more than one screenshot? Don’t worry – there’s an easy solution! Press the “Control” key while using the “Command+Shift+4” shortcut. This will allow you to take multiple screenshots on mac without saving each one individually. After taking all the screenshots, release the Control key, and they’ll all be saved automatically!
Making Edits to a Screenshot

Making edits to screenshots on Mac is an essential skill for those using Apple iOS devices. With the help of third-party apps, users can make quick and easy edits to their screenshots without having to open up a photo editor or leave their device. This simplifies the editing process and provides an excellent way for users to store and share their screenshots on mac online.
For starters, several different methods are available for taking a screenshot on an Apple device. Once they have captured their desired image, they can easily access editing tools such as cropping, resizing, adding text, and more directly from the Preview app that comes pre-installed on all Macs. Alternatively, users may opt for third-party apps that provide even greater customization options and features that can further enhance the look and feel of any screenshot taken on an Apple device.
Saving and Sharing Your Image

For Mac users, taking screenshots of essential images or text is a great way to save information quickly and easily. The ability to take screenshots on Mac computers has been around since before the launch of Apple iOS in 2007. With the help of shortcuts and applications, users can effortlessly capture any image or text on their screen and store it for later use.
Saving screenshots on mac after taking them is relatively simple on Mac computers. There are multiple ways that you can keep an image after screenshotting it, including saving it directly to your desktop as a PNG file, adding it to an existing folder in your system’s library, or using keyboard shortcuts (⌘+C) to copy and paste the image into another document or application.
Taking screenshot through an App:
Taking screenshots is one of the simplest yet most powerful tools in a tech user’s toolbox. Whether you need it for work or want to save a funny meme, taking screenshots on a Mac computer can be handy. Those familiar with Mac computers will be pleased to know that Apple has made the process very easy.
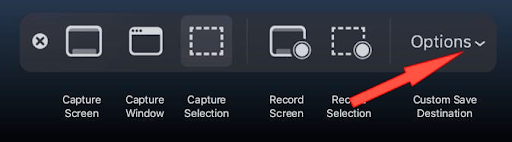
The best way to take screenshots on mac through an app on macOS is by using either keyboard shortcuts or the Screenshot app. To use the Screenshot app, first, open it from your Applications folder or Spotlight search bar. Inside the app, there are three main options: Capture Entire Screen; Capture Selected Windows, and Capture Selected Portion, which allows you to select what portion of your screen you’d like to capture. Once selected, click ‘capture’, and your screenshot will be saved as an image file onto your desktop.
Using Cmd + Shift + 5
Using Cmd Shift 5 on Mac is a powerful feature of the Apple iOS operating system. It allows users to take screenshots, record videos, and easily access other features such as screen recording. The combination of Command (Cmd), Shift, and five on a Mac lets users quickly access tools for capturing their screen with the ability to edit and share it.
The first thing that happens when you press Cmd +Shift+5 is that a small control panel pops up at the bottom of your screen. From here, you can choose from various options, like taking a screenshot or recording your entire display. Once you select an option, the tool will begin working immediately and give you the desired result in no time at all. You can also adjust settings like resolution, video quality, microphone input, and other features depending on what type of capture you are trying to accomplish.
Storing and Viewing Your Screenshots on mac
The Mac operating system is a popular platform for Apple iOS devices, making taking, storing, and viewing screenshots easy. Whether you’re using your device to capture game scores, essential images, or web pages for research, this article will help you navigate capturing and viewing your screenshots.
When you take a screenshot on your mac device, it will automatically save it to the desktop in PNG format. This makes accessing your screenshot quick and easy without locating it in other folders. To take a screenshot, press Command + Shift + 3 together on the keyboard, which will capture the entirety of the screen in one image. Suppose you’d like to take just a portion of the screen; press Command + Shift + 4 instead and use your mouse or trackpad to select only what you’d like captured into an image file.
Conclusion: Easy and Quick Capturing
In conclusion, taking screenshots on a Mac has become much more straightforward in 2022. Now, the process is more intuitive than ever, and users can easily have their screenshots on mac saved to the desktop or clipboard. Furthermore, users can also use keyboard shortcuts to quickly capture what they need without worrying about saving it. All of these features make taking screenshots on Mac in 2022 an efficient and straightforward task for everyone. It’s important to remember that these methods also work for other Apple devices like iPhones and iPads.
References:
- ‘Switching To The Mac: The Missing Manual’ by David Pogue.
- The second book on this list is ‘Mac OS X Lion Bible’ by Galen Gruman.
- “OS X Yosemite: The Missing Manual” by David Pogue.
- “Mac OS X Snow Leopard: Visual QuickStart Guide” by Maria Langer.